I saw a few of these floating around the blogging world, and thought I would try making my own! I needed a way to store my little girl's hair clips,
and I needed some more decorations for the nursery anyway. ;-) I had so much fun making one, I figured I would make a second one with a tutorial for you guys.
Little Girl's Hair Clip Holder
Supplies Needed:
- Picture frame
- Ribbon
- Hot Glue Gun (and Glue)
- White Cardstock
- Glue Stick
- Fabric
Step 1: Take the backing and glass off your picture frame and flip it over. Measure out your ribbon strips and lay them out, marking placement. Make sure to leave about 1/2" extra ribbon on each end. It's easier to trim later, than to stretch it out longer.
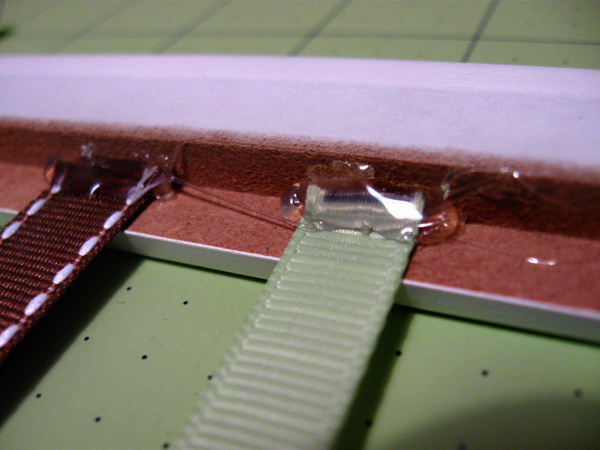
Step 2: Glue your ribbons in place. Start with one end first. Once the glue dries, pull the ribbon tight and glue the other end in place. Trim the extra ribbon.
Step 3: After gluing all the ribbons in place, it's a good idea to go over the ends a second time to keep them secure. You don't want these falling out after a few uses.
Step 4: Trim a piece of white cardstock to cover the backing for the frame. This is especially important if your fabric is thin or transparent. Glue in place with a regular glue stick.
Step 5: Lay your fabric out, and cut a piece a few inches larger than your backing.
Step 6: Fold the edges of the fabric over, and glue to the back of the cardboard using the hot glue gun. When making your corners, trim them for a smoother finish.
Step 7: If you have a support/stand, make sure your fabric does not hinder movement. I cut my fabric so it could still open fully.
Step 8: Assemble the frame and add your hair clips. You're done!!


1 comment:
So cute! I'm gonna have to do this! my baby girl has too many hairbows (that she REFUSES to wear). I need a place to put them.
Post a Comment