Showing posts with label Girls. Show all posts
Saturday, May 14, 2011
Wednesday, April 20, 2011
Crocheted Baby Gifts from Mom
I've mentioned that I inherited my sewing capabilities from my Mom. Well what I didn't get from her is the ability to crochet. I've tried to learn a couple times, and it's just not my cup of tea. My mom, however, has this amazing natural talent. It's like she was born with a crochet hook or something. She is always working on a crocheted baby blanket for someone we know. Usually someone from church. There is always someone pregnant there ;-)
So when she found out that she was going to be a Grandma, she got right to work making all sorts of gifts. This little one is going to be spoiled rotten! I thought I would share some of them with you gals. She amazes me every day at the things she is able to whip up.
This first one is an adorable set of booties and the tiniest little crocheted hat. I love the little flower! It's the perfect touch, don't you think? She also made a matching set of black booties in a slightly larger size. I can't wait to see what they look like with a pair of tiny white socks.
Today she surprised me at work with this adorable little sweater. I absolutely love it! She must have been listening when I talked about how we didn't have any newborn size jackets.. The detail in the pattern is so cute and feminine, I love it!
She also made some super cute beanies. I found a pattern on Etsy for this incredibly adorable owl beanie. They are all over on Etsy, and so stinkin' cute! I knew I absolutely had to have one for her newborn pictures. I bought the pattern and asked (aka begged) my Mom to make one for me. The whipped up this purple one that same night as a 'sizing sample.' And she finished the actual owl hat the very next day. It's so cute I can't stand it!!!!
And of course, she made a couple blankets as well. This first one was one of my baby shower gifts. It's nice and heavy. I love it. Our little girl is going to be so toasty warm in this!! I can't wait to wrap her up in it. The second one is very special. It's her blessing (aka Christening) blanket. This one will definitely be a special heirloom piece. It's much more delicate, and absolutely stunning. I love the pattern she chose.
So there you have it! I little peak into the kind of talent I was raised with. ;-) Love ya Mom!!! You're going to be one of the best Grandmas ever!!
So when she found out that she was going to be a Grandma, she got right to work making all sorts of gifts. This little one is going to be spoiled rotten! I thought I would share some of them with you gals. She amazes me every day at the things she is able to whip up.
This first one is an adorable set of booties and the tiniest little crocheted hat. I love the little flower! It's the perfect touch, don't you think? She also made a matching set of black booties in a slightly larger size. I can't wait to see what they look like with a pair of tiny white socks.
Today she surprised me at work with this adorable little sweater. I absolutely love it! She must have been listening when I talked about how we didn't have any newborn size jackets.. The detail in the pattern is so cute and feminine, I love it!
She also made some super cute beanies. I found a pattern on Etsy for this incredibly adorable owl beanie. They are all over on Etsy, and so stinkin' cute! I knew I absolutely had to have one for her newborn pictures. I bought the pattern and asked (aka begged) my Mom to make one for me. The whipped up this purple one that same night as a 'sizing sample.' And she finished the actual owl hat the very next day. It's so cute I can't stand it!!!!
And of course, she made a couple blankets as well. This first one was one of my baby shower gifts. It's nice and heavy. I love it. Our little girl is going to be so toasty warm in this!! I can't wait to wrap her up in it. The second one is very special. It's her blessing (aka Christening) blanket. This one will definitely be a special heirloom piece. It's much more delicate, and absolutely stunning. I love the pattern she chose.
So there you have it! I little peak into the kind of talent I was raised with. ;-) Love ya Mom!!! You're going to be one of the best Grandmas ever!!
Wednesday, April 6, 2011
WHW: Little Girls
Now that we are putting all the finishing touches on the Nursery, and the due date is getting closer.. I'm starting to get so excited! Sure I am also completely terrified.. mainly of the whole 'labor and delivery' part.. But I'm so excited to finally bring her home. <3
For those of you who don't know about We Heart Wednesday.. click HERE to go check it out! Every Wednesday, we gather up a bunch of photos from We Heart It and post them on our blogs. Visit Brie at her blog HERE to link up and check out everyone's posts. It's a great way to increase the traffic on your blog, and an even better way to meet new people!

For those of you who don't know about We Heart Wednesday.. click HERE to go check it out! Every Wednesday, we gather up a bunch of photos from We Heart It and post them on our blogs. Visit Brie at her blog HERE to link up and check out everyone's posts. It's a great way to increase the traffic on your blog, and an even better way to meet new people!
Saturday, April 2, 2011
Little Girl's Hair Clip Holder - Tutorial
I saw a few of these floating around the blogging world, and thought I would try making my own! I needed a way to store my little girl's hair clips, and I needed some more decorations for the nursery anyway. ;-) I had so much fun making one, I figured I would make a second one with a tutorial for you guys.
Little Girl's Hair Clip Holder
Supplies Needed:
- Picture frame
- Ribbon
- Hot Glue Gun (and Glue)
- White Cardstock
- Glue Stick
- Fabric
Step 1: Take the backing and glass off your picture frame and flip it over. Measure out your ribbon strips and lay them out, marking placement. Make sure to leave about 1/2" extra ribbon on each end. It's easier to trim later, than to stretch it out longer.
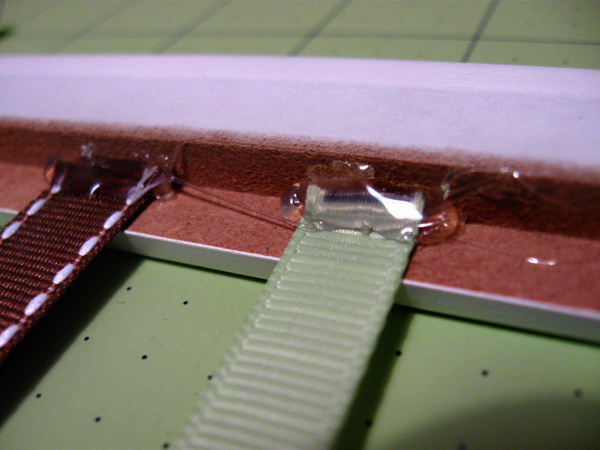
Step 2: Glue your ribbons in place. Start with one end first. Once the glue dries, pull the ribbon tight and glue the other end in place. Trim the extra ribbon.
Step 3: After gluing all the ribbons in place, it's a good idea to go over the ends a second time to keep them secure. You don't want these falling out after a few uses.
Step 4: Trim a piece of white cardstock to cover the backing for the frame. This is especially important if your fabric is thin or transparent. Glue in place with a regular glue stick.
Step 5: Lay your fabric out, and cut a piece a few inches larger than your backing.
Step 6: Fold the edges of the fabric over, and glue to the back of the cardboard using the hot glue gun. When making your corners, trim them for a smoother finish.
Step 7: If you have a support/stand, make sure your fabric does not hinder movement. I cut my fabric so it could still open fully.
Step 8: Assemble the frame and add your hair clips. You're done!!
Little Girl's Hair Clip Holder
Supplies Needed:
- Picture frame
- Ribbon
- Hot Glue Gun (and Glue)
- White Cardstock
- Glue Stick
- Fabric
Step 1: Take the backing and glass off your picture frame and flip it over. Measure out your ribbon strips and lay them out, marking placement. Make sure to leave about 1/2" extra ribbon on each end. It's easier to trim later, than to stretch it out longer.
Step 2: Glue your ribbons in place. Start with one end first. Once the glue dries, pull the ribbon tight and glue the other end in place. Trim the extra ribbon.
Step 3: After gluing all the ribbons in place, it's a good idea to go over the ends a second time to keep them secure. You don't want these falling out after a few uses.
Step 4: Trim a piece of white cardstock to cover the backing for the frame. This is especially important if your fabric is thin or transparent. Glue in place with a regular glue stick.
Step 5: Lay your fabric out, and cut a piece a few inches larger than your backing.
Step 6: Fold the edges of the fabric over, and glue to the back of the cardboard using the hot glue gun. When making your corners, trim them for a smoother finish.
Step 7: If you have a support/stand, make sure your fabric does not hinder movement. I cut my fabric so it could still open fully.
Step 8: Assemble the frame and add your hair clips. You're done!!
Subscribe to:
Posts (Atom)